 |
| Anthropologie photo |

Showing posts with label DIY. Show all posts
Showing posts with label DIY. Show all posts
Monday, February 24, 2014
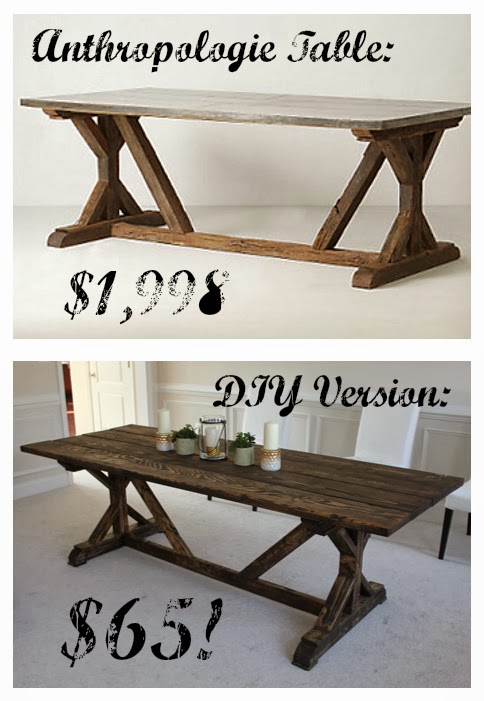
Holy &*%$ - I built a table!
Ok, guys, I am really proud of myself for this one. I built a table. A serious, giant dining table. And it actually turned out well.
Thursday, December 19, 2013
{DIY} Crate Coffee Table
We're slowly starting to get more furniture to fill up the house, and I built my very first piece! This coffee table (that I spotted here ages ago and have planned to make ever since) was a great starter piece - considering I have absolutely no experience building anything beyond Ikea furniture, this was surprisingly easy!


Wednesday, October 9, 2013
{DIY} Etched Glass Dog Treat Jar
I just got a Silhouette Portrait. It's my new toy. I've been seeing discount packages offered on various blogs for a while now and have been tempted every time I see a new offer, so I finally pulled the trigger and got one. The deal this time was a glass etching bundle. The deal is over now, unfortunately, but if you're interested in getting one in the future, just keep your eyes open for the packages offered on a lot of craft/DIY blogs (not mine - I'm not an affiliate; I just think the discount blogger packages are the best deal!).


Monday, September 30, 2013
{DIY} Gold & Chalkboard Flower Pots
Back in May when we went to the UK, we had a cookout at our friends' flat. We used some fresh herbs they had growing out back, and I decided I finally needed to get around to planting my own. On my first shopping trip after we got home, I saw some herbs for sale in the grocery store and snatched up every single kind they had. The only problem: I didn't have confidence that I'd actually be able to keep them alive for more than, like, two weeks (plant serial killer - guilty!), so I bought the cheapest little terra cotta planters I could find. Shockingly, my herbs have actually lasted! Since it seems the herbs are here for the long term, I decided to give my basic pots an upgrade with chalkboard paint and gold Rub 'n Buff.


Saturday, August 17, 2013
Budget Laundry Room Renovation
Our condo's laundry room (or more accurately, tiny laundry closet) has been in sad shape for quite a while. We had a giant hole in the wall from when someone came to investigate a leak. We never bothered to fix it since it's so tucked away (you have to walk through my closet in order to get to the door to the laundry closet). Before moving, we just planned to fix the hole and slap on a fresh coat of paint. Turns out, it needed a full-blown renovation, but we were able to complete it for about $50 and minimal time, so it worked out for the best!
4.jpg) |
| Not a true before, but just imagine a giant hole in the wall and (rotted) baseboards in place |
Monday, March 25, 2013
DIY Return Air Grille {That's actually pretty!}
I've been pinning away on my home decor projects board. The problem is, for about 99% of them, I want to do the projects in our new house, so there's not a lot I can start on yet. But one pin I came across was perfect for our condo - this one. Our return air grille was all mangled, and most likely original to our mid-1980s building. It always looked ugly but I managed to ignore it... until we got our HVAC unit replaced. Now our air filters go directly behind the grille, so we have to unscrew the stupid/ugly/nasty thing every few months, then awkwardly try to replace it in the busted up drywall. Not fun. So, I decided to make a new one that would a) look a million times better, and b) be much more simple to remove and replace.


Sunday, February 24, 2013
DIY Reusable "Paper" Towels
In general, we try to be diligent about minimizing our impact on the environment - reduce, reuse, recycle, and all that good stuff. But I have a confession to make - I'm a horrible paper towel waster (although I do buy recycled paper towels, at least!). They're just so easy. But I keep seeing these reusable towel rolls and figured they shouldn't be toooo much more of a pain than regular towels, so I decided to finally suck it up and make a set of my own.

Monday, January 28, 2013
DIY Valentine's Door Hanger
If you follow me on Instagram (@jdeares), you may have gotten a sneak peak of this project over the weekend. I submitted a pic of it for A Night Owl blog's #ANOweekend project since this weekend's theme was handmade. Check out A Night Owl's Instagram section if you're not familiar with the project - there's a new theme each weekend, and it's always a lot of fun!


Sunday, December 9, 2012
Christmas Ball Ornament Wreath
I made a Christmas ball ornament wreath today. This should be a really simple project. But I didn't buy nearly enough balls and had to improvise. I also overpaid for my balls. If you want to make one, aim to get lots & lots of cheap balls!!

Materials:
I started by taking the hanger and turning it into a circle. I folded one end over to make a secure end (or so I thought - one ball slipped off and shattered, oops!! Be careful to make sure your end is actually secure!). Then just keep sliding the ornaments down the hanger until you get a nice, full wreath. I just slipped them on trying to mix up the colors and sizes but didn't stick to any particular pattern.
Once all of your ornaments are on, wrap the two ends of the hanger around each other to close it off. I had a lot of excess hanger - you can cut it off if you prefer, although I used it to hang my wreath by wrapping the excess hanger around the door knocker. Add a bow if you'd like, and hang it up!
My Added Complications
My wreath turned out to be a lot smaller than I was planning initially, but that's one advantage to using the hanger over a preformed wreath - you can adjust the size of the wreath as necessary. Even with my smaller sized wreath, I was still struggling with my puny amount of balls - it wasn't full enough at all. When I held it up, the balls would slide to the bottom, so I had to figure out a solution to avoid having a very bare wreath (since I refused to just go buy more like a normal person would do...). At first I was trying to make a wreath backing out of cardboard - I figured if the wreath was flat on the back and all the balls were pushed to the front, it would help to fill it out more. In theory, I think that would work but I was having trouble successfully executing it, so I scraped that idea. I ended up tying some wire around the top of the hanger, then winding it around some of the ornaments so that they were basically tied to the top of the wreath and wouldn't slip down. I would imagine that you wouldn't need to worry about that if you had enough ornaments to make the wreath as full as it should be, but using wire to tie them in place works well enough if you have to resort to that method. However, it does give you less flexibility with adjusting the balls once you're finished. I'd guess that it would be easier to scoot them around to hide bare spots if they weren't tied. Also in a couple of places my wreath was kind of lumpy/not completely circular looking. I pulled one ball off entirely because it was sticking out, but there are a couple of spots where it still looks kind of weird. Again, I would think that if you had a full wreath and the balls were able to settle naturally, this would be less of a problem.
In addition to not buying enough balls, I'm also annoyed at myself for spending too much on the ones I did buy. I went to Michael's and the ornaments were all 50% off, so I just got them there without thinking much about it. But even with the sale and my puny-balled wreath, I still spent $30 on the ornaments! I would never normally spend that much on a pre-made wreath, so why did I spend that much on materials to make my own?! This evening I went to the grocery store and saw ornaments for $2.50 a box - half the price I paid. They were plastic but would have worked fine (and actually maybe that would be better - having that much glass hanging up makes me nervous!). I bet I could have found them for even less than that had I actually looked around a bit.
Lessons learned - next time I will buy more ornaments and spend less!! And sorry for the text overload and lack of pics to show the process - that's something else to fix in my next go-around!

Materials:
- Wire hanger
- Boatloads of balls - I used 22 large balls & 30 small - not nearly enough!! Depending how big you are making it, I'd guess 80-100 would be ideal
- Ribbon - if you want to add a bow
- Wire or String - if you need it to make/attach the bow, to hang your wreath, or if you didn't buy enough balls (described below)
- Scissors
I started by taking the hanger and turning it into a circle. I folded one end over to make a secure end (or so I thought - one ball slipped off and shattered, oops!! Be careful to make sure your end is actually secure!). Then just keep sliding the ornaments down the hanger until you get a nice, full wreath. I just slipped them on trying to mix up the colors and sizes but didn't stick to any particular pattern.
Once all of your ornaments are on, wrap the two ends of the hanger around each other to close it off. I had a lot of excess hanger - you can cut it off if you prefer, although I used it to hang my wreath by wrapping the excess hanger around the door knocker. Add a bow if you'd like, and hang it up!
My Added Complications
My wreath turned out to be a lot smaller than I was planning initially, but that's one advantage to using the hanger over a preformed wreath - you can adjust the size of the wreath as necessary. Even with my smaller sized wreath, I was still struggling with my puny amount of balls - it wasn't full enough at all. When I held it up, the balls would slide to the bottom, so I had to figure out a solution to avoid having a very bare wreath (since I refused to just go buy more like a normal person would do...). At first I was trying to make a wreath backing out of cardboard - I figured if the wreath was flat on the back and all the balls were pushed to the front, it would help to fill it out more. In theory, I think that would work but I was having trouble successfully executing it, so I scraped that idea. I ended up tying some wire around the top of the hanger, then winding it around some of the ornaments so that they were basically tied to the top of the wreath and wouldn't slip down. I would imagine that you wouldn't need to worry about that if you had enough ornaments to make the wreath as full as it should be, but using wire to tie them in place works well enough if you have to resort to that method. However, it does give you less flexibility with adjusting the balls once you're finished. I'd guess that it would be easier to scoot them around to hide bare spots if they weren't tied. Also in a couple of places my wreath was kind of lumpy/not completely circular looking. I pulled one ball off entirely because it was sticking out, but there are a couple of spots where it still looks kind of weird. Again, I would think that if you had a full wreath and the balls were able to settle naturally, this would be less of a problem.
In addition to not buying enough balls, I'm also annoyed at myself for spending too much on the ones I did buy. I went to Michael's and the ornaments were all 50% off, so I just got them there without thinking much about it. But even with the sale and my puny-balled wreath, I still spent $30 on the ornaments! I would never normally spend that much on a pre-made wreath, so why did I spend that much on materials to make my own?! This evening I went to the grocery store and saw ornaments for $2.50 a box - half the price I paid. They were plastic but would have worked fine (and actually maybe that would be better - having that much glass hanging up makes me nervous!). I bet I could have found them for even less than that had I actually looked around a bit.
Lessons learned - next time I will buy more ornaments and spend less!! And sorry for the text overload and lack of pics to show the process - that's something else to fix in my next go-around!
Friday, November 30, 2012
Easy upgrade to basic stockings
Our Christmas decorations are mostly from the year we graduated from college and moved in together - we bought an apartment-full of decorations as cheaply as we could. Then we ran out of storage space and I asked my parents to hang on to our decorations - then somehow, every year, we're never able to get them in time for the holidays! I ended up buying a smaller replacement set of decorations, again as cheaply as possible. So now we've got two sets of the most basic stockings you can get, and twice I've ended up making similar upgrades so they weren't quite so plain!

With our first set of stockings, I found some iron-on letters with our initials. This (grainy) pic is from the year I first made them - 2005! Ahh where does the time go?!
.JPG)
That also happened to be the Christmas that Bryan surprised me with this adorable little fur-baby - Aria was only about 8 weeks old when she became a part of our family on this Christmas!

Fast forward a few years - Once I got the replacement stockings I kept them plain in the beginning. Then this past weekend I finally gave them a little extra sumthin-sumthin. I got a 3-pack of felt star ornaments from Michaels for $1, then glued them to our stockings. Take a look - it's not bad for a $0.33 upgrade, eh?

Maybe one of these days we'll actually get something other than the cheap, furry stockings, but for now I'm happy with these. Whether you use iron-on decals or glue, this is a simple way to make basic stockings look a little more unique!
What kind of stockings do you hang in your house?? During most of my childhood, I had a cartoony looking reindeer that would light up and sing a song when you pressed it. My taste was impeccable. ;)
Thursday, November 29, 2012
Dog {and cat?} paw print ornaments
I saw a dog paw print Christmas ornament on Pinterest a couple of months ago and thought it was such a great idea. But since then I've been seeing them all over the place - there are kits you can buy and everything... so I guess I was a little slow to notice this idea (but I still like it!).

It's a pretty basic process - get/make some clay (I just used a block of Sculpey), press a paw in it, make a hole, bake it, and hang it on a string. I did learn a few tips though...
I found the Sculpey clay to be kind of hard and it was tough to get a deep print. I warmed it up in the microwave for about 20 seconds, and it worked much better. Smokey also like it much better (warm & smushy > room temp & stiff). Even after trying the microwave trick, it took me two tries - you can see the one on the left isn't very well defined.

Other than the clay, my tools included a drinking glass used upside-down to get a nice circle, a kabob stick to write Smokey's name & the date, a butter knife to make a slot, and of course the ribbon.
I planned to make a kitty version too. It could just be me, but from my experience, kitty prints do not work. Aria's print just looked like a tiny, undefined blob. Not exactly tree material. I still wanted an ornament for her though, so I tried out my sculpting skills - elementary school art class style. I may not have a career as a professional sculptor in store, but it turned out better than I expected (plus it was fun to play with the clay!).

And lastly, you can't really tell from the pics, but this is silver clay with tiny sparkles in it. It looks great with the Christmas tree lights. When given the option, always go for sparkles.


It's a pretty basic process - get/make some clay (I just used a block of Sculpey), press a paw in it, make a hole, bake it, and hang it on a string. I did learn a few tips though...
I found the Sculpey clay to be kind of hard and it was tough to get a deep print. I warmed it up in the microwave for about 20 seconds, and it worked much better. Smokey also like it much better (warm & smushy > room temp & stiff). Even after trying the microwave trick, it took me two tries - you can see the one on the left isn't very well defined.

I planned to make a kitty version too. It could just be me, but from my experience, kitty prints do not work. Aria's print just looked like a tiny, undefined blob. Not exactly tree material. I still wanted an ornament for her though, so I tried out my sculpting skills - elementary school art class style. I may not have a career as a professional sculptor in store, but it turned out better than I expected (plus it was fun to play with the clay!).

And lastly, you can't really tell from the pics, but this is silver clay with tiny sparkles in it. It looks great with the Christmas tree lights. When given the option, always go for sparkles.

Sunday, November 25, 2012
Free Christmas Poster Printables
Have you decorated for the holidays yet? I like having Thanksgiving so early in the month - I feel like I'm much more ahead of schedule than usual!

Here are links to a number of Christmas printables if you'd like to add some to your frames! Check out each of the links - sometimes there are more options than shown here.
 | ||
Nest of Posies - Chalkboard Printables
|

 |
| A Night Owl & Just Us Three Designs - Joy to the World |
 |
| Sweet Rose Studio - Reindeer & Jingle |
 |
| Tattered and Inked - Reindeer Names |
 |
| Design Dazzle - Chevron Merry Christmas |
 |
| Less Cake More Frosting - Believing |
 |
| Printable Decor - Cheer & Trees |
| Over the Big Moon - Cold Outside |
 |
| Antsi-Pants - Christmas subway art |
 |
| The Jacobs Clan - Variety of Christmas printables |
 |
| Polkadots on Parade: Tree & Ho Ho Ho |
 |
| Agape Love - Merry Christmas |
 |
| Two Twenty One - Chevron |
 |
| Tattered and Inked - Most Wonderful |
 |
| Creationz - Ho Ho Ho |
 |
| Simple as That - Christmas Word Tree |
 |
| Capital B - O Holy Night |
 |
| Sugar Tot Designs - 12 Days |
 |
| aka Design - Joy & Adore |
 |
| The 36th Avenue - Advent Tree |
 |
| Today's Creative Blog - Holiday Cheer |
 |
| Lemon Squeezy - Tree |
Aren't they great?! Do you know of any others I should add??
Featured:

Foreign Coin Magnets
What do you do with your foreign coins? We never really figured out what to do with them - they just sort of turn up randomly around the house, although whenever I see them, it makes me happy. When I saw a pin on this post from Tattered Style, I knew I finally had a foreign coin solution!

These were the coins I was able to find after a quick search, since like I said, we don't really have a spot where we keep them. I used round magnets and a hot glue gun. My magnets didn't seem very powerful and some of the coins were fairly heavy, so I was afraid they might not stick well, but they work perfectly fine. This project literally just takes a few minutes, looks great (they're classy looking magnets, aren't they??), and brings back happy memories whenever I go to the fridge. I love them!

These were the coins I was able to find after a quick search, since like I said, we don't really have a spot where we keep them. I used round magnets and a hot glue gun. My magnets didn't seem very powerful and some of the coins were fairly heavy, so I was afraid they might not stick well, but they work perfectly fine. This project literally just takes a few minutes, looks great (they're classy looking magnets, aren't they??), and brings back happy memories whenever I go to the fridge. I love them!
Monday, November 19, 2012
DIY Bina Wrap/Cardigan/Blouse/Scarf {or Dracula Cape}

.JPG)
.JPG)
Why hello, hello, and happy Monday to you! How was your weekend? Ours was pretty busy - we had an event with Bryan's company Friday night, a wedding in Annapolis on Saturday (don't you love the photo booth trend?), and then I ran the Vienna Turkey Trot on Sunday (Smokey & Bryan were there to support and even ran across the finish line with me). Fun times!
Anyway, I'm finally getting around to posting about the wrap I made last week. I recently came across this pin from the Fine Craft Guild to make your own Bina Brianca wrap. I hadn't heard of the wrap before, but since it sounded like pretty much the easiest project ever, I decided to give it a try.
 |
| 64" fabric =Dracula cape |
Once I de-capeified it, here's what it looks like in a few more of the different styles. For more (with directions), see the Bina Brianca website. I doubt I'll ever wear a lot of the options, but even as a plain old cardigan it's really cozy - plus it's basically wrinkle-proof so it's great for traveling (and I always love traveling in big drapy sweaters that can double as a blanket).


And here's what it looks like laying flat:

Featured in Tutorials & Tips Link Party {86} at Home Stories A to Z!
Subscribe to:
Posts (Atom)